• JavaScript Object Creation and Prototype Chains

    There are 4 ways to create new objects in JavaScript:

    1. Object initializers, also known as literal notation
    2. Object.create
    3. Constructors
    4. ES6 classes

    Depending on which method you choose, the newly created object will have a different prototype chain1.

    1. Object initializers

    let x = { a: 1 }
    
    Object.prototype.isPrototypeOf(x) // true
    

    Objects created in this manner will have Object.prototype as its top-level prototype:

    x => Object.prototype
    

    Arrays and functions also have their own literal notation:

    let y = [1,2,3]
    
    Array.prototype.isPrototypeOf(y) // true
    Object.prototype.isPrototypeOf(Array.prototype) // true
    
    let z = () => {} // ES6 fat arrow syntax
    
    Function.prototype.isPrototypeOf(z) // true
    Object.prototype.isPrototypeOf(Function.prototype) // true
    

    In these cases, y’s and z’s prototype chains will be

    y => Array.prototype => Object.prototype
    

    and

    z => Function.prototype => Object.prototype
    

    respectively.

    2. Object.create

    Object.create takes in an arbitrary object (or null) as a first argument, which will be the prototype of the new object2.

    let x = {
      a: 1
    }
    let y = Object.create(x)
    
    y.a === 1 // true
    
    x.isPrototypeOf(y) // true
    Object.prototype.isPrototypeOf(x) // true
    

    Thus, y’s prototype chain is:

    y => x => Object.prototype
    

    Object.create is actually quite special because any arbitrary object can be specified as the prototype, so we can do otherwise nonsensical things such as:

    let x = [1,2,3]
    let y = Object.create(x)
    
    y.forEach // is valid, returns function forEach()
    x.isPrototypeOf(y) // true
    

    In this case, y’s prototype chain will be:

    y => x => Array.prototype => Object.prototype
    

    3. Constructors

    When a3 function Thing is invoked with the new keyword, as in let x = new Thing(), it behaves as a constructor function, which means the following things will happen:

    1. A new, empty object is created, whose prototype is Thing.prototype (the prototype object of the Thing function object)
    2. The body of the function Thing is executed, with its this set to the new empty object
    3. The return value of the Thing function is the result of the new Thing() expression, unless no return value is specified, then the new object is returned
    function Thing() {}
    
    let z = new Thing()
    
    Thing.prototype.isPrototypeOf(z) // true
    

    To highlight the fact that the prototype property object is distinct from the object to which it belongs to, notice the following:

    Function.prototype.isPrototypeOf(Thing) // true
    Object.prototype.isPrototypeOf(Thing) // true
    
    Function.prototype.isPrototypeOf(Thing.prototype) // false
    Object.prototype.isPrototypeOf(Thing.prototype) // true
    

    If we think of Thing.prototype as simply an object, this shouldn’t come as a surprise. In fact, if we were do something like this:

    Object.prototype.a = 1
    Function.prototype.b = 2
    z.a // 1
    z.b // undefined
    

    Thus, z’s prototype chain looks like:

    z => Thing.prototype => Object.prototype
    

    and not

    z => Thing.prototype => Function.prototype => Object.prototype
    

    ES6 Classes

    Prototype chains in ES6 classes behave almost exactly like constructors (that is because classes are syntactic sugar around constructors):

    class Thing {
      a() { return 1 }
      b() { return 2 }
    }
    
    class AnotherThing extends Thing {
      b() { return 3 }
      c() { return 4 }
    }
    
    let x = new AnotherThing()
    x.c = () => { return 5 }
    
    x.a() // 1
    x.b() // 3
    x.c() // 5
    
    AnotherThing.prototype.isPrototypeOf(x) // true
    
    Thing.prototype.isPrototypeOf(AnotherThing.prototype) // true
    

    Thus, x’s prototype chain is:

    x => AnotherThing.prototype => Thing.prototype => Object.prototype
    

    And of course, as mentioned earlier, classes really are just syntactic sugar for constructors:

    Thing.isPrototypeOf(AnotherThing) // true
    
    Function.prototype.isPrototypeOf(Thing) // true
    Function.prototype.isPrototypeOf(AnotherThing) // true
    

    See footnote4 for a little more detail on how subclassing with extends actually works and how it affects the prototype chain between the subclass and the superclass.

    Footnotes
    1. I’ve used isPrototypeOf here for better readability, but you can also substitute it for its inverse, __proto__, like

      js x.__proto__ === Object.prototype // true

    2. And another optional object as a second argument that specifies property descriptors.

    3. When I mean “a”, I actually mean any arbitrary function. Of course, functions meant to be used as useful constructors should look a certain way.

    4. Part of Babel’s transpiled output for extends includes a _inherits function, the full body of which is below:

      function _inherits(subClass, superClass) { 
        if (typeof superClass !== "function" && superClass !== null) { 
          throw new TypeError("Super expression must either be null or a function, not " + typeof superClass); 
        } 
      
        subClass.prototype = Object.create(superClass && superClass.prototype, {
          constructor: { 
            value: subClass, 
            enumerable: false, 
            writable: true, 
            configurable: true } 
        }); 
      
        if (superClass) subClass.__proto__ = superClass; 
      }
      

      _inherits explicitly creates the subclass’s prototype object using Object.create, specifying the super class’s prototype as its prototype. It also sets the subclass’s __proto’s property to the superclass.

  • Setting Up a Second Graylog2 Server Node

    Technical Context: Ubuntu 14.04, first Graylog2 IP: 11.11.11.11, second Graylog2 IP: 22.22.22.22

    1. Install Graylog2

    Instructions here.

    (Note that the installing the Graylog web interface, graylog-web, is optional).

    2. MongoDB

    If your MongoDB instance already runs on a seperate machine from any of your Graylog, all you have to do is adjust your firewall rules for that machine (if any exists) to allow the IP address of the new Graylog2 server node to connect to port 27017 (or whatever custom port you’ve defined for your MongoDB instance).

    Otherwise

    If your MongoDB instance lives on the same machine as an existing Graylog2 node, that means your current configuration (/etc/mongod.conf) will look something like this (it should, or you’re in big trouble):

    #port = 27017
    
    # Listen to local interface only. Comment out to listen on all interfaces.
    bind_ip = 127.0.0.1
    

    This means that your MongoDB instance is only accessible to other processes running on the same machine. If so, you may or may not have authentication set up on your MongoDB instance - it doesn’t really matter.

    You will need to change your MongoDB configuration to listen on a publicly accessible interface. Change bind_ip by either commenting it out, or changing it to 0.0.0.0.

    Now that your MongoDB instance is publicly accessible, we’re going to have to take necessary security measures.

    MongoDB authentication

    Here, I’ll cover authentication in MongoDB very quickly. Open a MongoDB shell, make sure that you’re using the correct database, then create a new user with read and write privileges:

    $ mongo
    > use graylog2
    > db.createUser({ user:"graylogusername", pwd:"graylogpassword", roles:[{role: "readWrite", db:"graylog2"}] })
    

    Once that’s done, we can tell Graylog2 to use these credentials when connecting to MongoDB. In recent versions of Graylog2, the MongoDB connection is recommended to be specified using MongoDB connection string URI format, which may look something like this:

    mongodb_uri = mongodb://graylogusername:graylogpassword@127.0.0.1:27017/graylog2
    

    Firewall

    After setting up authentication, you’d also want to set up appropriate firewall policies. Specifically, you should allow only the second Graylog2 server node to connect to MongoDB. I wrote a comprehensive guide to using APF and BFD here, which you should read. The APF rule for allowing 22.22.22.22 to connect to port 27017 looks like this:

    # from the other graylog node to access MongoDB
    tcp:in:d=27017:s=22.22.22.22
    

    3. Graylog2

    Most of these instructions come straight from the official docs:

    Change is_master to false:

    is_master = false
    

    Copy the password_secret from the existing Graylog2 server node:

    password_secret = KlU1JJYpKeJq9oy5JsWKSA8sf8aJ8anNnisNs1fWEWjAAq7bI246K42idz79r10E5Z1klrGAhtl1Af2fUp4NxNRAAk31lvVX
    

    Change the MongoDB connection credentials (see above).

    Change the Elasticsearch settings to match your first Graylog2 server node’s (most importantly, the elasticsearch_discovery_zen_ping_unicast_hosts setting, which tells Graylog2 which Elasticsearch nodes to connect to)

    4. Graylog2 Web Interface

    The web interface runs independently of any Graylog2 server nodes, so all we have to do now is inform it about the additional node that we’re adding1:

    $ vim graylog-web-interface.conf
    

    If you were previously running the web interface on the same machine as an existing Graylog server node, then you’d see

    graylog2-server.uris="http://127.0.0.1:12900/
    

    which you can append to, like so:

    graylog2-server.uris="http://127.0.0.1:12900/,http://22.22.22.22:12900/"
    

    (In case you were wondering, yes, you can run multiple web interfaces for failover purposes, but I’m guessing the web interface is for internal consumption only so this may be overkill.)

    Footnotes
    1. More specifically, we’re pointing the web interface to the Graylog2 server nodes’ REST API, which is open on port 12900 by default.

  • Setting Up Advanced Policy Firewall (APF) and Brute Force Detection (BFD)

    This post is a fairly comprehensive reference to Advanced Policy Firewall (apf-firewall), a user-friendly interface of iptables. We will also cover BFD (bfd), a script that automates IP blocking using APF.

    Technical Context: Ubuntu 14.04, APF v9.7, BFD v1.5-2

    Installation

    $ apt-get install apf-firewall
    
    $ wget http://rfxnetworks.com/downloads/bfd-current.tar.gz
    $ tar xfz bfd-current.tar.gz
    $ cd bfd-1.5-2
    $ ./install.sh
    

    Basic Usage

    apf -s - Start
    apf -f - Stop
    apf -r - Restart
    apf -e - Refresh APF rules
    apf -a <IP> - manually allow IP
    apf -d <IP> - manually block IP
    apf -u <IP> - manually unblock IP (works for BFD too)
    

    What -a actually does is add the IP entry to the allow_hosts.rules file. -d does the same thing for deny_hosts.rules. -u removes the IP entry from either allow_hosts.rules or deny_hosts.rules, if it exists. All three commands will call apf -e as well.

    APF supports CIDR notation for specifying rules for IP blocks, as well as fully qualified domain names (FQDR)1.

    There are basically three ways to use APF:

    1. Restrict on a per-IP basis
    2. Restrict on a per-port basis
    3. Restrict on a IP-port combination basis

    Restrict on a per-IP basis

    The most straightforward to do this is, as mentioned earlier, by using -a, -d and -u. Of course, you can edit allow_hosts.rules or deny_hosts.rules directly as well (specify each IP address on a new line).

    Restrict on a per-port basis

    By default, APF blocks a number of known malicious ports (see the main config file for an exhaustive list). To allow all incoming or outgoing connections on a per-port basis, we can edit the IG_TCP_CPORTS or EG_TCP_CPORTS setting respectively in APF’s main config file /etc/apf-firewall/conf.apf:

    # incoming connections
    IG_TCP_CPORTS="22,80,443"
    IG_UDP_CPORTS=""
    
    # outgoing connections
    EG_TCP_CPORTS="21,25,80,443,43"
    EG_UDP_CPORTS="20,21,53"
    

    Notably, these settings are overriden by rules in allow_hosts.rules and deny_hosts.rules.

    Restrict on a IP-port combination basis

    The allow_hosts.rules and deny_hosts.rules is very well commented regarding the syntax for specifying granular restrictions, so I’ll cover them only briefly here:

    # Syntax:
    # proto:flow:[s/d]=port:[s/d]=ip(/mask)
    # s – source , d – destination , flow – packet flow in/out
    

    For example:

    tcp:in:d=22:s=192.168.2.1
    

    in allow_hosts.rules will allow incoming connections from 192.168.2.1 to port 22.

    Multiple IPs to the same port need to be specified on separate lines:

    tcp:in:d=22:s=192.168.2.1
    tcp:in:d=22:s=192.168.31.4
    ...
    

    APF Configuration

    Some other noteworthy APF configuration settings in /etc/apf-firewall/conf.apf that you should change:

    Development Mode

    DEVEL_MODE="1"
    

    When set to "1", APF will deactivate itself after every 5 minutes. This prevents you from setting stupid rules and cutting yourself out from a remote machine.

    Remember to set this to "0" once APF is determined to be functioning as desired.

    Monokernel

    SET_MONOKERN="0"
    

    It might be an issue in situations where iptables is installed into the kernel rather than as a package. In those cases, you’ll see something like:

    Unable to load iptables module (ip_tables), aborting.
    

    or

    $ apf -s
    apf(17079): {glob} activating firewall
    apf(17120): {glob} kernel version not equal to 2.4.x or 2.6.x, aborting.
    

    Setting it to SET_MONOKERN="1" will fix the problem.

    Ban Duration

    RAB_TIMER="300"
    

    I recommend setting this a lot higher than the default of 300 seconds. 21600 (6 hours), maybe?

    Reactive Address Blocking

    RAB="0"
    

    Set this to “1” to activate APF’s reactive address blocking.

    Subscriptions

    APF can subscribe to known lists of bad IP addresses. The below is an abridged portion of the config file that deals with this:

    ##
    # [Remote Rule Imports]
    ##
    # Project Honey Pot is the first and only distributed system for identifying
    # spammers and the spambots they use to scrape addresses from your website.
    # This aggregate list combines Harvesters, Spammers and SMTP Dictionary attacks
    # from the PHP IP Data at:  http://www.projecthoneypot.org/list_of_ips.php
    DLIST_PHP="0"
    
    DLIST_PHP_URL="rfxn.com/downloads/php_list"
    DLIST_PHP_URL_PROT="http"
    
    # The Spamhaus Don't Route Or Peer List (DROP) is an advisory "drop all
    # traffic" list, consisting of stolen 'zombie' netblocks and netblocks
    # controlled entirely by professional spammers. For more information please
    # see http://www.spamhaus.org/drop/.
    DLIST_SPAMHAUS="0"
    
    DLIST_SPAMHAUS_URL="www.spamhaus.org/drop/drop.lasso"
    DLIST_SPAMHAUS_URL_PROT="http"
    
    # DShield collects data about malicious activity from across the Internet.
    # This data is cataloged, summarized and can be used to discover trends in
    # activity, confirm widespread attacks, or assist in preparing better firewall
    # rules. This is a list of top networks that have exhibited suspicious activity.
    DLIST_DSHIELD="0"
    
    DLIST_DSHIELD_URL="feeds.dshield.org/top10-2.txt"
    DLIST_DSHIELD_URL_PROT="http"
    

    BFD Configuration

    BFD barely has any configuration (which is A Good Thing™). The below is pretty much it:

    $ vim /usr/local/bfd/conf.bfd
    

    You can set the threshold for the number of attempts before an IP address is blocked:

    TRIG="15"
    

    The default number of 15 is quite generous - I’d lower it to at most 5 or 6.

    BFD also has email alerts:

    EMAIL_ALERTS="1"
    EMAIL_ADDRESS="wow@example.com"
    

    We can add whitelisted IP addresses in:

    $ vim /usr/local/bfd/ignore.hosts
    

    IP addresses whitelisted by BFD are still subjected to APF’s rules - they do not have any influence on each other.

    Finally, and most importantly, BFD is started with:

    $ bfs -s
    

    which will also start a cron job2 that goes through your access log files every 3 minutes and tells APF to ban any IP addresses that goes beyond the specified threshold in TRIG.

    BFD Logs

    BFD logs to /var/log/bfd_log.

    Footnotes
    1. I won’t be demonstrating this here, but this should apply to virtually any setting where an IP address is otherwise expected.

    2. You can verify this by checking /etc/cron.d/bfd.

  • Load Balancing Graylog2 with HAProxy

    This post covers quick and dirty TCP load balancing with HAProxy, and some specific instructions for Graylog2.

    (As an aside, if you’re looking for a gem that can log Rails applications to Graylog2, the current official gelf-rb gem only supports UDP. I’ve forked the repo and merged @zsprackett’s pull request in, which adds TCP support by adding protocol: GELF::Protocol::TCP as an option. I’ll remove this message when the official maintainer for gelf-rb merges @zsprackett’s pull request in.)

    Technical context: Ubuntu 14.04, CentOS 7

    1. Install HAProxy

    On Ubuntu 14.04:

    $ apt-add-repository ppa:vbernat/haproxy-1.5
    $ apt-get update
    $ apt-get install haproxy
    

    On CentOS 7:

    # HAProxy has been included as part of CentOS since 6.4, so you can simply do
    $ yum install haproxy
    

    2. Configure HAProxy

    You’ll probably need root privileges to configure HAProxy:

    $ vim /etc/haproxy/haproxy.cfg
    

    There will be a whole bunch of default configuration settings. You can delete those that are not relevant to you, but there’s no need to at this moment if you just need to get started.

    Simply append to the file the settings that we need:

    listen graylog :12203
        mode tcp
        option tcplog
        balance roundrobin
        server graylog1 123.12.32.127:12202 check
        server graylog2 121.151.12.67:12202 check
        server graylog3 183.222.32.27:12202 check
    

    This directive block named graylog tells HAProxy to:

    1. Listen on port 12203 - you can change this if you want
    2. Operate in TCP (layer 4) mode
    3. Enable TCP logging (more info here)
    4. Use round robin load balancing, in which servers are distributed connections in turn. You can even specify weights for different servers with different hardware configurations. More on the different load balancing algorithms that HAProxy supports here
    5. Proxy requests to these three backend Graylog2 servers through port 12202, and check their health periodically

    3. Create a TCP input on Graylog2

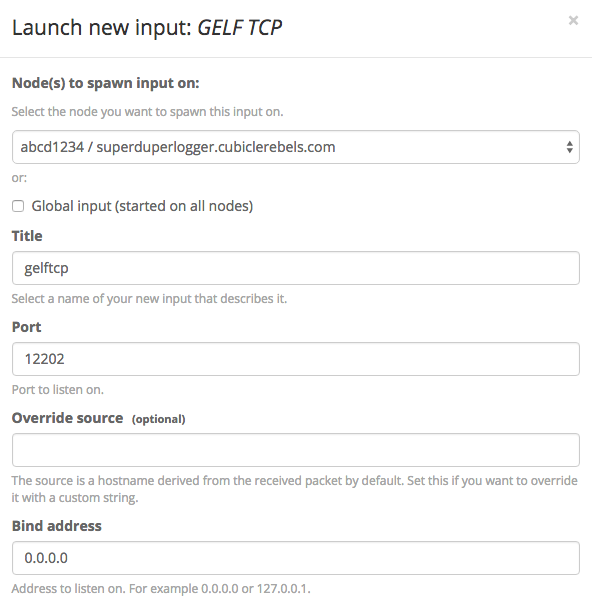
    Creating a TCP input on Graylog2 through the web interface is trivial. We’ll use port 12202 here as an example:

    menu

    Go to System/Inputs > Inputs

    new-input

    Create a new GELF TCP input

    input-settings

    Input (or ignore) your desired settings

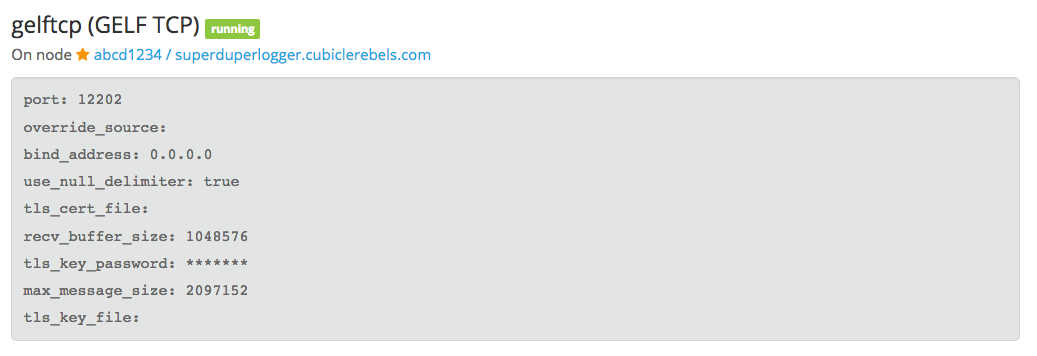
    active-input

    Ta-da!

    3. Start HAProxy

    $ service haproxy start
    

    You can test if HAProxy is proxying the requests successfully by sending TCP packets through to HAProxy and checking the number of active connections on Graylog2’s input page.

    # assuming 123.41.61.87 is the IP of the machine running HAProxy
    # run this on your dev machine
    $ nc 123.41.61.87 12203
    

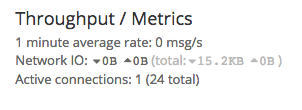
    You should see something like:

    active-conns

    Great success

    4. Change HAProxy’s health check to Graylog2’s REST API

    The last thing to do, and really, the only part of HAProxy that’s specific to Graylog2, is to change the way HAProxy checks the health of its backend Graylog2 servers.

    Normally, HAProxy defaults to simply establishing a TCP connection.

    However, HAProxy accepts a directive called option httpchk, in which HAProxy will send a HTTP request to some specified URL and check for the status of the response. 2xx and 3xx responses are good, anything else is bad.

    For Graylog2, they’ve exposed a REST API for the express purpose of allowing load balancers like HAProxy to check its health:

    The status knows two different states, ALIVE and DEAD, which is also the text/plain response of the resource. Additionally, the same information is reflected in the HTTP status codes: If the state is ALIVE the return code will be 200 OK, for DEAD it will be 503 Service unavailable. This is done to make it easier to configure a wide range of load balancer types and vendors to be able to react to the status.

    The REST API is open on port 12900 by default, so you can try the endpoint out:

    # the IP address of one of our Graylog2 servers
    $ curl http://123.12.32.127:12900/system/lbstatus
    ALIVE
    

    (The web interface also exposes the full suite of endpoints that the REST API provides, which you can access by System > Nodes > API Browser)

    With that, we can indicate in the HAProxy configuration that we want to use Graylog2’s health endpoint:

    listen graylog :12203
        mode tcp
        option tcplog
        balance roundrobin
        option httpchk GET /system/lbstatus
        server graylog1 123.12.32.127:12202 check port 12900
        server graylog2 121.151.12.67:12202 check port 12900
        server graylog3 183.222.32.27:12202 check port 12900
    

    Parting Notes

    Right now, we have HAProxy installed on one instance that load balances requests between multiple instances running Graylog2. However, there’s still a single point of failure (if HAProxy goes down).

    Ideally, the best way to set up what is commonly called a high availability cluster would be to set up several HAProxy nodes, then employ Virtual Router Redundancy Protocol (VRRP). Under VRRP, there is an active HAProxy node and one or more passive HAProxy nodes. All of the HAProxy nodes share a single floating IP. The passive HAProxy nodes will ping the active HAProxy node periodically. If the active HAProxy goes down, the passive HAProxy nodes will elect the next active HAProxy node amongst themselves to take over the floating IP. Keepalived is a popular solution for implementing VRRP.

    Sadly, VPSes such as Digital Ocean do not support multiple IPs per instance, making Keepalived and VRRP impossible to implement (there’s a open suggestion on DO where many users are asking for this feature). To mitigate this issue somewhat, we’ve used Monit to monitor and automatically reboot HAProxy if it goes down. It’s not foolproof, and we’ll be on the lookout to improve this setup.

  • Topick - JavaScript NLP library to extract keywords from HTML documents

    I recently wrote Topick, a library for extracting keywords from HTML documents.

    Check it out here!

    The initial use case for it was to be used as part of a Telegram bot which would archive shared links by allowing the user to tag the link with keywords and phrases:

    mure1

    mure2

    This blog post details how it works.

    HTML parsing

    Topick uses htmlparser2 for HTML parsing. By default, Topick will pick out content from p, b, em, and title tags, and concatenate them into a single document.

    Cleaning

    That document is then sent for cleaning, using a few utility functions from the textminer library to:

    • Expand contractions (e.g. from I’ll to I will)
    • Remove interpunctuation (e.g. ? and !)
    • Remove excess whitespace between words
    • Remove stop words using the default stop word dictionary
    • Remove stop words specified by the user

    Stop words are common words that are unlikely to be classified as keywords. The stop word dictionary used by Topick is a set union of all six English collections found here.

    Generating keywords

    Finally, the cleaned document can be used as input for generating keywords. Topick includes three methods of doing so, which all relies on different combinations of nlp-compromise library functions to generate the final output:

    • n-grams
    • namedentities
    • combined

    The n-grams method relies solely on the generateNGrams method to generate keywords/phrases based on frequency. The generated words or phrases are then sorted by frequency and filtered (those with frequency 1 are discarded).

    The namedentities method relies on the generateNamedEntitiesString method to guess keywords or phrases that are capitalized/don’t belong in the English language/are unique phrases. There’s also a frequency-based criterion here.

    The combined method combines both by running both n-grams and namedentities and merging their output together before sorting them and filtering them. This method is the slowest but generally produces the best and most consistent output.

    Custom options

    Topick includes a few options for the user to customize.

    ngram

    { min_count: 3, max_size: 1 }
    

    The ngram method defines options for n-gram generation.

    min_count is the minimum number of times a particular n-gram should appear in the document before being considered. There should be no need to change this number.

    max_size is the maximum size of n-grams that should be generated (defaults to generating unigrams).

    progressiveGeneration

    This options defaults to true.

    If set to true, progressiveGeneration will progressively generate n-grams with weaker settings until the specified number of keywords set in maxNumberOfKeywords is hit.

    For example: if for a min_count of 3 and maxNumberOfKeywords of 10, Topick only generates 5 keywords initially, then progressiveGeneration will decrease the min_count to 2, and then to 1, until 10 keywords can be generated.

    progressiveGeneration does not guarantee that maxNumberOfKeywords keywords will be generated (like if even at min_count of 1, your specified maxNumberOfKeywords still cannot be reached).