As a school holiday project, I made a Hugo site to document all of my favourite music from 2015, and released the theme separately as a standalone called Cathode. Check the site out here, and the theme here.
Note: I’m writing this post concurrently, so it’ll be kinda be stream-of-consciousness.
Objectives:
- Learn something new
- Document my favourite music
I have about 4-5 days.
Learn something new
I looked through a list of static site generators over at https://www.staticgen.com/ and picked the highest-ranking one that was written in a language I wasn’t already familiar with. If I have pick up a new language, this will be a great motivator. I picked Hugo.
I also wanted to learn PostCSS, having heard many great things in the past. I’ve become very comfortable with SASS, Compass, and Susy. A little too comfortable.
Document my favourite music
I could have done it the traditional way: 1/2-column layout, top 20 albums, top to bottom, that’s it. Easy to do, a no-brainer with a blog-aware generator like Hugo. Also, at around this point I realize how ridiculously fast Hugo is.
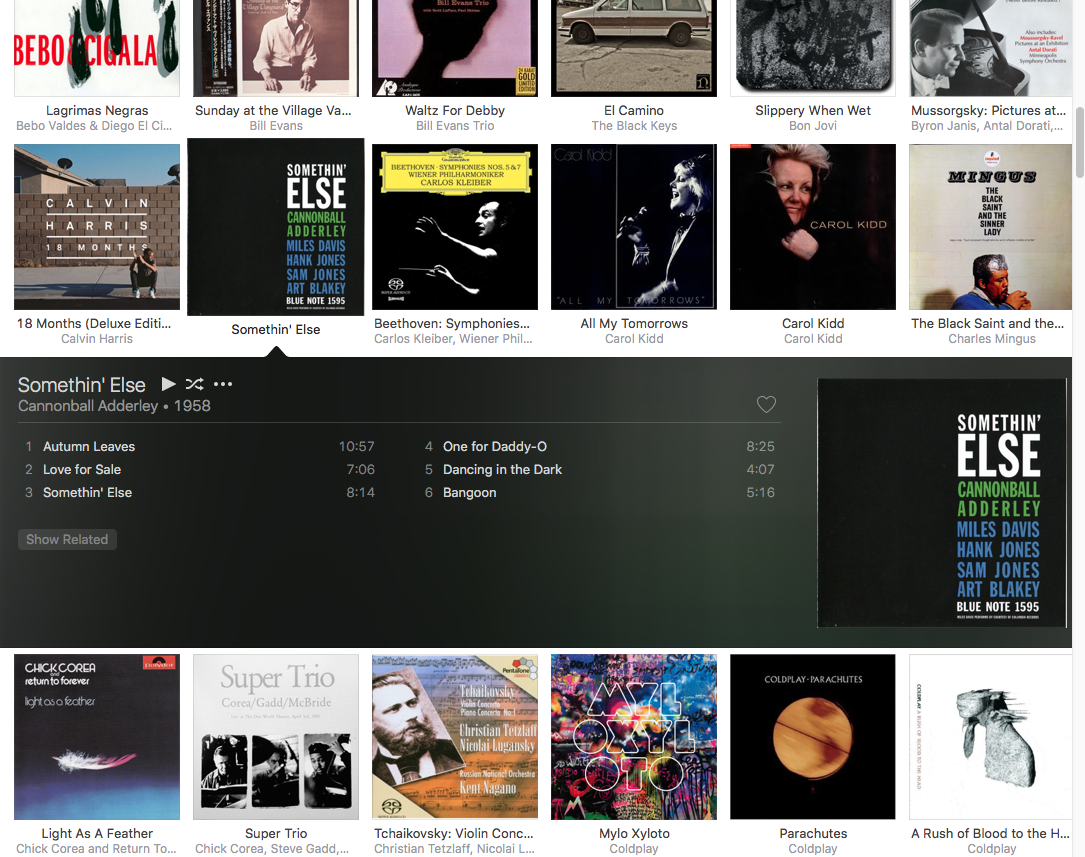
I want to replicate iTunes’s album view interface. I think it’s possible - might be quite challenging, but it’ll be fun. Well-defined end goal is also a good thing. Does it make sense for the web?

iTunes’s album view interface
Performance
The site will be image-heavy, because album art. But it needs to be as fast as I can make it in the time I have. Image optimisation, yup, ImageOptim - lazy loading, yeah, I can do that I think, but I’ll leave the difficult parts to the last.
jQuery
jQuery is like fast food. It gets you your nutrition, and fast. It’s not good for you in the long run, but I only have 4 days; I need to pick my battles. Also, I don’t want to waste one whole day setting up Webpack or any dev workflow, so no ES6. I hate ES5 so this will force me to write as little JavaScript as possible. This is a good thing because performance and because I’m working on a Redux and Express project concurrently and I’m finding out that it’s possible to OD on JavaScript, even with ES6 and fancy experimental ES7 features.
Templating with Go
Hugo uses Go’s html/template library. Having used my fair share of templating languages - ERB, Handlebars, DTL (Django template language), Liquid, Slim, Jbuilder - Go templates by far uses the weirdest syntax I’ve ever seen. This is an actual example from their docs:
{{ isset .Params "caption" | or isset .Params "title" | or isset .Params "attr" | if }}
I’m sure part of it is because I don’t actually know much Go. I really like the template functions though, because they remind me of Haskell.
Colours
A big part of iTunes’s album view UI is the colour transition. Thankfully, somebody already did all the hard work, and even made a JavaScript port of it. It’s called Colibri, and is meant for use in the browser. I suggest reading the first link - it’s damn cool (and I’m lucky that I don’t have to do any of that).
I went with that for a while, but it turns out that it’s a pretty expensive computation - each image takes about 200-300ms to compute, which quickly adds up. After experimenting with different ways to keep the UI responsive, I gave up and modified Colibri to work with Node instead.
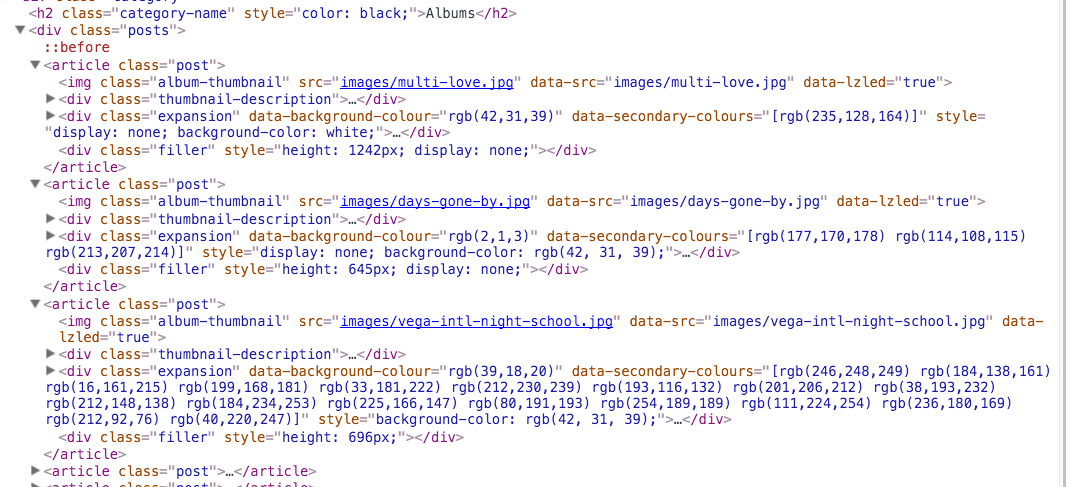
Colibri uses the Canvas API, so to precompute the colours I need a Node equivalent of Canvas, which came in the form of node-canvas. It also requires installing Cairo. After doing all that, I manage to get Colibri to run with Node. I store its output as a JSON file in the data folder, which Hugo can access (under the .Site.Data key) when compiling its templates. I store the colour info as data attributes so the JavaScript can access that.

An example of how the colours are precomputed and stored.
I also include a fallback (as a theme option) so that users can continue to use Colibri in the browser if for some reason they cannot precompute the colours.
PostCSS
PostCSS is great! I used Lost as my grid system, and having used Susy for a while now I can say that Lost can completely replace Susy in my future CSS workflow. My entire PostCSS stylesheet, including responsive styles, comes up to only 128 lines. It’s incredibly productive. PostCSS processing is also generally included as part of a larger workflow (webpack, Gulp, etc) but since I’m not using any of that I opted to use postcss-cli instead, which works great as a standalone watch-and-compile workflow.
CSS Transitions
For colour transitions I originally used jQuery Color (when you’re using jQuery, everything looks like a problem to be solved with a jQuery plugin), but quickly switched out to using CSS3 transitions instead, which makes it noticeably faster. The only remaining major part I’m using jQuery for is the slideUp and slideDown transitions. I don’t think it’s very difficult to make a CSS3 version of its behaviour (which is a little more nuanced than transitioning the height property), but it’ll do for now. This will definitely be the next major thing to do, if I continue to work on it.
Lazy loading
At this point, the site is almost done. It’s going to have a lot of images, but worse than that it’s going to have a lot of Spotify and Youtube iframe embeds. They do much more damage to performance. If I’m going to find a lazy loading solution for images, it has to work for iframes as well. lazyload by vvo comes out pretty highly on the Google, and it works for iframes as well. Cool. I hope this works. I change my Youtube and Spotify shortcodes to include the data-src and onload attributes as required by lazyload:
<iframe src=about:blank data-src="https://embed.spotify.com/?uri=" height="400" frameborder="0" allowtransparency="true" onload=lzld(this)></iframe>
as well as the images:
<img class="album-thumbnail" src="data:image/gif;base64,R0lGODlhAQABAIAAAP///wAAACwAAAAAAQABAAACAkQBADs=" data-src="/images/.jpg" onload="lzld(this)">
while using a placeholder 1px gif loaded in base64. I’m not sure if this is a better idea than just using an actual .gif file.
I refresh the page and monitor the request count. I scroll - the request count jumps. Great! I click on an album to expand its content. The request count jumps again, and the empty space is suddenly populated with the iframe. Holy shit! This is way easier than it should be. Thanks vvo. Open source is the best thing ever.
Writing
That took me a little more than 2 days to do. Now that I’m actually done, it’s time to write the actual content.
…
This actually ended up taking way more time than making the site, because I had to write something a little more than “This shit is really good. Go listen to it.” This is my first time “reviewing” music, so I don’t have a workflow for doing this except going through my saved albums on Spotify and Youtube and consolidating and relistening to everything and just bashing words out. I definitely need to improve my writing and use more difficult and descriptive words.
I’d also like to clarify that the relative paucity of mainstream or pop albums in the “Albums” soundtrack does not indicate that I’m necessarily hipster or just being deviant for its own sake (okay fine, maybe it does a bit). What’s actually happening here is that most mainstream or pop albums, like I mentioned briefly in my review of Dopamine, are “carriers” for singles. So even though the singles are good, most of the time the rest of the album just doesn’t match up. As a result, the album won’t be included, but the aforementioned singles will end up in the “Singles” category instead.
Parting Notes
All in all, this took me about 6 days to do, from brainstorming to deployment (on Github Pages). The first day was learning about Hugo and how it worked, and setting up scaffolding and workflow. 2 days for coding the site, and the last 3 days for writing actual content. I’m actually not even done with the content yet. I’ve only finished the “Albums” category, but I haven’t gotten started with my favourite live shows or singles, so that’ll take me a while more to do.
Cathode is:
- 57 lines of template code
- 47 + 89 lines of JavaScript (not counting jQuery and lazyload :/)
- 128 lines of PostCSS
Not that lines of code correlate directly to code quality or efficiency, but still. It was a good learning experience. I don’t think people write enough about the end-to-end process and intricacies of front-end development, so I hope this gives you a glimpse of what it’s like.
Thanks for reading!

