• Pretty Form Validation with Redux Form

    I made a nice and unobtrusive animation for form validation with redux-form:

    a

    To implement it, I made a FormInput component:

    import React, { Component } from 'react'
    
    export default class FormInput extends Component {
      render() {
    
        const inputState = (field) => {
          if (this.props.field.error) {
            return 'error'
          } else if (this.props.field.touched && this.props.field.value) {
            return 'pass'
          } else {
            return ''
          }
        }
    
        const inputType = this.props.type || 'text'
    
        return (
          <div>
            <label>{this.props.label}</label>
            <input className={inputState(this.props.field)} type={inputType} {...this.props.field} />
          </div>
        )
      }
    }
    

    The CSS for the component is surprisingly simple:

    input {
      border: 1px solid #ddd;
      padding-left: 5px;
      width: 300px;
      transition: 0.2s cubic-bezier(0.68, -0.55, 0.265, 1.55) all;
    }
    
    input.error {
      border-left: 8px solid #D0021B;
    }
    
    input.pass {
      border-left: 8px solid #7ED321;
    }
    
    input:focus {
      border-left: 8px solid #449CFA;
    }
    

    The border style is for overriding the browser’s default border styling, and can be left out if you already have existing border styles for your inputs. The padding-left gives a bit of spacing between the indicator and the text in the input.

    It’s important to note that, for the width of the input to stay fixed even as the border is transitioned in, you need to make sure that your box-sizing is set to border-box. Paul Irish’s CSS snippet works like a charm:

    html {
      box-sizing: border-box;
    }
    *, *:before, *:after {
      box-sizing: inherit;
    }
    

    Now we can use it in a redux-form component like so:

    const validate = values => {
      const errors = {}
      if (!(values.email) || !(values.email.trim())) {
        errors.email = 'Email required'
      }
      return errors
    }
    
    @reduxForm({
      form: 'login',
      fields: ['email', 'password'],
      validate
    })
    class LoginForm extends Component {
      static propTypes = {
        fields: PropTypes.object,
        handleSubmit: PropTypes.func
      }
      render() {
        const { fields: {email, password}, handleSubmit } = this.props
        return (
          <form onSubmit={handleSubmit}>
            <FormInput label='Email' field={email} />
            <FormInput type="password" label='Password' field={password} />
            <button type='submit' onClick={handleSubmit}>Login</button>
          </form>
        )
      }
    }
    

    🙌

  • How Closures Actually Work

    Like objects, closures are a mechanism for containing state. In JavaScript, a closure is created whenever a function accesses a variable defined outside the immediate function scope. It’s easy to create closures: Simply define a function inside another function, and expose the inner function, either by returning it, or passing it into another function. The variables used by the inner function will be available to it, even after the outer function has finished running.
    - Eric Elliott, The Two Pillars of JavaScript — Pt 2: Functional Programming

    Most online articles on closures start with a definition that resembles something like the above. It’s a description of its behaviour and how to create one. What most of them (read: all of them) fail to do is explain how closures are actually implemented, and then, why they behave the way they do. I believe this is important for truly understanding closures, and eventually, why closures are as important as they are.

    This is a post on how closures are implemented in Ruby, and it is directly inspired from Pat Shaughnessy’s excellent book Ruby Under a Microscope. I also wrote 2 other posts as notes while going the book: How Ruby Classes Are Implemented and How Ruby Objects Are Implemented.


    A closure is a data structure that contains a lambda expression, which is a function that takes a set of arguments, and an environment to be used when the lambda expression is invoked.

    Closures in Ruby can be created in a few different ways. Here, a closure is created using a do block:

    outside_string = "I am a string."
    5.times do |n|
      p "Iteration #{n}: #{outside_string}"
    end
    

    When the first line is executed, Ruby first creates a RString structure representing the string I am a string. on the heap, and then pushes a reference to the RString onto its internal stack, in the current stack frame.

    At the same time, the current rb_control_frame_ton the Ruby call stack also has a EP pointer (EP stands for Environment Pointer) referencing the current stack frame:

    step-1

    When the second line is executed, the Ruby tokenizer has already determined that a do block is present to be passed to the times method as an argument. YARV pushes a C structure representing the block, called rb_block_t, onto the call stack. rb_block_t contains a few things:

    typedef struct rb_block_struct {
      VALUE self;
      VALUE klass;
      VALUE *ep;
      rb_iseq_t *iseq;
      VALUE proc;
    } rb_block_t;
    

    self is the value the self pointer in the block’s environment.

    klass refers to the class of the current object.

    *ep is identical to the EP pointer found in the preceding rb_control_frame_t, which references the current internal stack frame.

    *iseq is a pointer to the compiled YARV instructions that correspond to the Ruby code inside the block, which in this case is:

    p "Iteration #{n}: #{outside_string}"
    

    If we disassemble the line above, we can see the actual YARV instructions:

    code = <<END
    p "Iteration \#{n}: \#{outside_string}"
    END
    
    puts RubyVM::InstructionSequence.compile(code).disasm
    
    == disasm: <RubyVM::InstructionSequence:<compiled>@<compiled>>==========
    ...
    0002 putself
    0003 putobject        "Iteration "
    0005 putself
    0006 opt_send_without_block <callinfo!mid:n, argc:0, FCALL|VCALL|ARGS_SIMPLE>
    0008 tostring
    0009 putobject        ": "
    0011 putself
    0012 opt_send_without_block <callinfo!mid:outside_string, argc:0, FCALL|VCALL|ARGS_SIMPLE>
    0014 tostring
    0015 concatstrings    4
    0017 opt_send_without_block <callinfo!mid:p, argc:1, FCALL|ARGS_SIMPLE>
    ...
    

    These are the actual instructions that YARV will execute when 5.times is run with the block as its argument. This is how the stacks look like when the block is evaluated.

    step-2

    Then, when 5.times is actually executed, Ruby creates another frame stack for the times method.

    step-3

    Within the times method, there is a call to yield that executes the block for each iteration, which means that there is yet another stack frame created for it:

    step-4

    There are now three stack frames here. The bottom one belongs to the top-level scope (which could be the top-level Ruby scope, or a function), the middle one belongs to the times method, and the top one belongs to the currently executing block.

    The yield method also does another crucial job: it copies the EP in the block’s rb_block_t to the block’s current stack frame. The copying is indicated with a red arrow in the diagram. This is what allows the block to access both its own local variables (like n) as well as the variables in the surrounding environment.

    This is how a closure is achieved with a do block in Ruby - the block here is the lambda expression, and it is associated with an environment when it is called, using the EP that is copied by yield.


    We now explore the other way of creating closures in Ruby: lambdas and procs. Lambdas and procs have a pattern that is quite similar to what one might see in JavaScript, for good reason: they are a representation of functions as a data value that can, amongst other things, be the return value of another function. For this discussion, we will look at this example:

    def name_filler
      private_string = "My name is:"
      lambda do |name|
        puts "#{private_string} #{name}"
      end
    end
    
    x = name_filler
    x.call('John') # "My name is: John"
    

    The equivalent version in JavaScript would look something like:

    function nameFiller() {
      const private_string = "My name is:"
      return function(name) {
        console.log(`${private_string} ${name}`)
      }
    }
    
    let x = nameFiller()
    x('John') // "My name is: John"
    

    Recall that strings are created on the heap and referenced in the stack. When name_filler is executed during the assignment of the variable x, a RString representing My name is: is created on the heap and a single reference to it is pushed onto the stack. Then, when the name_filler function returns, its stack frame is popped off the stack, and there are no longer any references to that RString structure on the heap, which means that it is eligible for garbage collection.

    However, when we call the method call on x in the next line, it still “knows” the value of private_string and returns what we expect: My name is: John.

    What gives?

    The reason lies in the lambda method. When lambda is called, what Ruby does is that it copies everything in the current stack frame into the heap.

    lambda-step1

    Along with the copy of the stack frame, Ruby also creates two other objects: rb_env_t, which acts as a wrapper around the copy of the stack frame, and rb_proc_t, which is the actual object that is returned from name_filler. rb_proc_t contains a rb_block_t structure whose EP references the heap copy of the stack frame, not the original stack frame on the stack. In this manner, you can think of rb_proc_t as a wrapper around rb_block_t that allows blocks to be represented as actual objects. rb_proc_t also has a is_lambda flag to indicate whether it was created as a proc using proc or Proc.new, or as a lambda using lambda. The differences between the two are relatively minor, and you can look them up.

    Now, when name_filler is returned and its stack frame is popped off the stack, there is still a reference to the RString which originates from its clone in the heap, which is what allows x.call('John') to execute like how we’d expect. This is how the stack looks like after the name_filler stack frame is popped off. There is a variable x in the parent scope that now references the rb_proc_t:
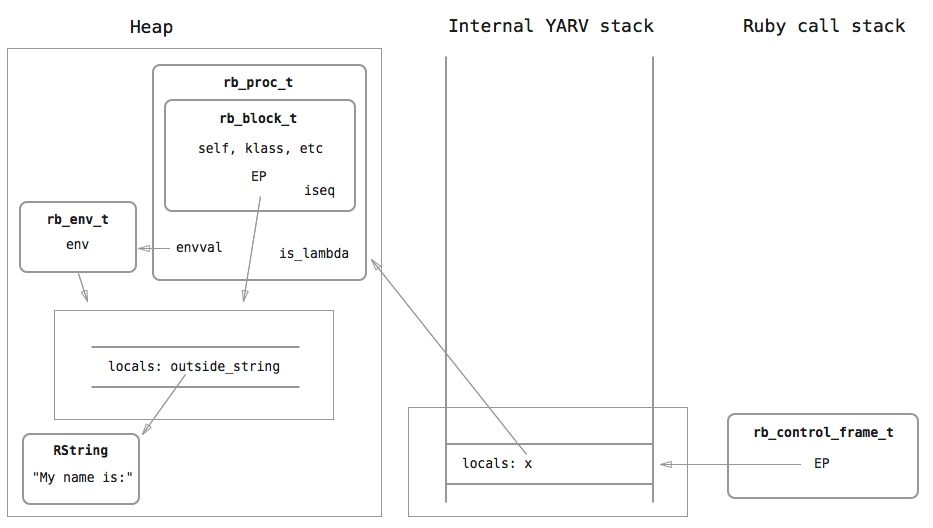
    lambda-step2

    When the call method executes, a stack frame for the block is created on the stack, as usual. Instead of yield copying the EP reference from the relevant rb_block_t in the case of blocks, we now get it from the rb_proc_t instead:
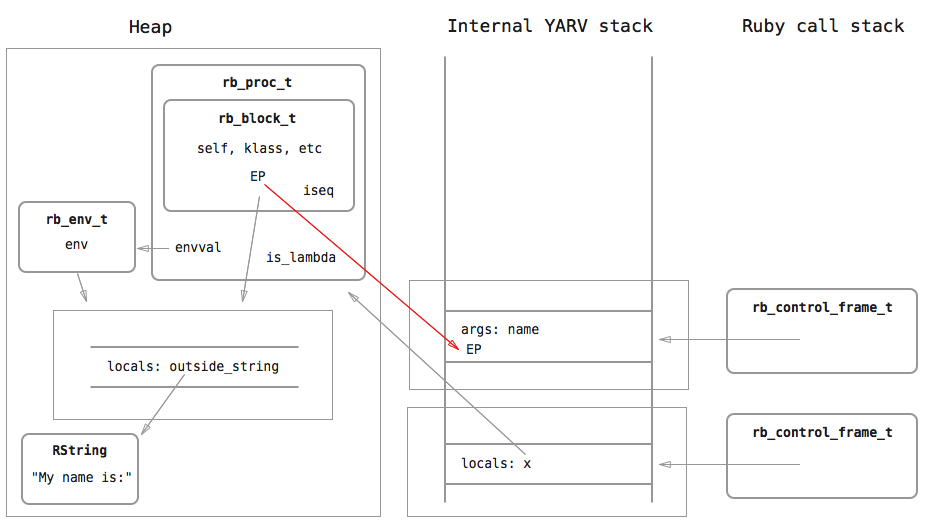
    lambda-step3

    This is how a closure is created with lambdas and procs in Ruby. As you can see, the representing structure, rb_proc_t, fulfils the two properties of closures: it contains a lambda expression, as well as a reference to an environment that it was created in. rb_proc_t, being an object on the heap, is able to persist across function calls and can be passed around as a value, whereas blocks, being represented by rb_block_t on the stack, are lost as soon as the current stack frame is popped off, and cannot be passed around as a value.

    Conclusion

    It’s quite likely that the implementation of closures in JavaScript (and other langauges) follows largely the same implementation principles of saving a copy of the current stack frame into the heap, so understanding this will lead to a language-agnostic understanding of the concept of closures.

    Once I understood how closures were implemented, I was in awe of how elegant it was. I hope I manage to convey that same sense of awe in this post, and give you a clearer picture of what closures actually are, instead of describing in a circular manner their usage and behaviour.

    Further reading: Closures in Ruby by Paul Cantrell (he seems to have a stricter definition of closures, but the general idea remains the same)

  • Custom File Processing Forms in Active Admin

    I needed to add a form to Active Admin so that a client could upload tsv files, which would be parsed and the data added to the database. Here’s how I did it.

    In app/admin, register the relevant model with ActiveAdmin. In this case, the tsv files contain information of users, which would be loaded into the database, so we park it under the User model.

    # app/admin/user.rb
    ActiveAdmin.register User, namespace: :activeadmin do
      # other Active Admin stuff
    end
    

    Then, we add an action_item to the User panel, and associate that with a collection_action, which we use to render a form partial.

    # app/admin/user.rb
    ActiveAdmin.register User, namespace: :activeadmin do
      # other Active Admin stuff
      action_item only: :index do
        link_to 'Upload TSV', action: 'upload_tsv'
      end
    
      collection_action :upload_tsv do
        render 'admin/tsv/upload_tsv'
      end
    end
    

    upload_tsv

    # app/views/admin/tsv/upload_tsv/html.erb
    <%= form_tag({action: :import_tsv}, multipart: true) do %>
      <%= file_field_tag 'tsv_file' %>
      <%= submit_tag "Upload TSV" %>
    <% end %>
    

    form

    We indicate the :import_tsv action in the form partial, which is added as below:

    # app/admin/user.rb
    collection_action :import_tsv, method: :post do
      # tsv parsing logic here
      flash[:notice] = "TSV file imported successfully!"
      redirect_to action: :index
    end
    

    This action can contain any arbitrary parsing application logic, the result of which can be displayed to the user in a flash notice, as demonstrated simply above. Also note that the file is not stored subsequently.

  • MVC Organisation with Express and Thinky

    I wrote an example to demonstrate a way to organise your Express app in a MVC manner without resorting to complicated frameworks.

    Check it out here.

    This particular example is as barebones as possible. In particular, there’re no explicit view layer to speak of - we’re simply returning JSON. We could have implemented, for example, server-side rendered React/Redux into this example, and I intend to do that in as a separate example.

    There are a few concepts I want to talk about here:

    • routes.js
    • schema.js
    • Model files
    • Controller files

    index.js

    First, we import babel-polyfill so that we can use async/await, which greatly simplifies working with promises and is the main reason behind the leanness of the code.

    import 'babel-polyfill'
    

    Then, we import express and body-parser to create the main Express object, and to parse the body of POST requests that are sent in either x-www-urlencoded or JSON format.

    import express    from 'express'
    import bodyParser from 'body-parser'
    const app     = express()
    
    app.use(bodyParser.json())
    app.use(bodyParser.urlencoded({extended: true}))
    

    Then, we require the config file, which contains the connection details for RethinkDB. We inject the config object as a dependency to schema.js, which creates the connection to RethinkDB and bootstraps our database schema and table objects. I will be using this pattern a lot more throughout the example.

    const config  = require('./config')
    const models = require('./schema')(config)
    

    schema.js

    In schema.js, we define the entire schema, just like schema.rb in Rails. I will defer the details of the syntax to thinky’s documentation. Note that this file can swapped out for any other ORM if you want (Sequelize, etc).

    After the schema is defined, we pass the thinky database objects to the model files:

    const allModels = { User, Post, Category }
    
    return {
      User:     require('./models/User')(r, allModels),
      Post:     require('./models/Post')(r, allModels),
      Category: require('./models/Category')(r, allModels),
    }
    

    As a matter of convenience, I chose to pass all the models so that model methods can reference other database objects as well.

    Model Methods

    Model methods serve as a way to encapsulate ORM logic and make it reusable. Even though ORMs themselves already offer a layer of abstraction on top of the database, I prefer having model methods as an additional layer to meet common needs in your application’s business logic. Model methods are also handy in case you ever want to swap out the ORM for another one down the road.

    As an example, let’s look at the User model:

    module.exports = (r, models) => {
      const { User } = models
      return {
        find: function(id) {
          const user = User.get(id)
          return user
        },
    
        create: function(params) {
          const { id, username, email } = params
          const newUser = new User({ id, username, email })
          return newUser.save()
        },
      }
    }
    

    A user has find and create methods, which behaves like User.find and User.create in Rails. The find method is simply a thin wrapper around the User.get thinky method, while create wraps around the new User and save thinky calls. This is especially notable because using constructor functions (new) is generally a bad idea (a questionable design decision on thinky’s part), but wrapping it around our create model method limits the potential damage it can cause.

    Routing

    Back to index.js, the routing is initialized by passing in the Express object and our models.

    require('./routes')(app, models)
    

    The routes are found in routes.js, and is designed in a way as to mimic routes.rb functionality in Rails. I discuss further about the design behind this routing here. One defines “top-level” resources in the routes constant - any routes defined in their corresponding router files will be mounted on the root. In this particular example, we have two top-level resources: users and categories.

    const routes = [
      'users',
      'categories'
    ]
    

    Resources that are logically nested within another resources are defined in the nestedRoutes constant as a Map. Here, posts is a resource nested under users.

    const nestedRoutes = new Map()
    nestedRoutes.set('users', ['posts'])
    

    Let’s look at the User controller:

    module.exports = (router, models) => {
      const { User } = models
      router.post('/', async (req, res) => {
        try {
          const newUser = await User.create(req.body)
          res.json(newUser)
        } catch(e) {
          res.sendStatus(422)
        }
      })
    }
    

    This particular endpoint is mounted on POST /users and is used to create a new user. As you can see, we destructure models and assign User, and call the create model method with the request’s body. We then respond with create’s return value, which is the information of the newly-created user. If an exception is thrown during create, then we return a 422 to indicate an unprocessable entity.

    Conclusion

    That pretty much sums up the entire “framework”. As I mentioned, this is a very barebones example, but it serves as a solid base for a minimal MVC Express app. I may expand on this example with examples of custom middleware and actual explicit views (e.g. React).

  • David Bowie Star Special

    Unsurprisingly, David Bowie had excellent taste in music. I made a Spotify playlist of the records he chose on this show, save for He’s My Star by Little Richard and Lies by The Staple Singers. The version of 21st Century Schizoid Man here is also a cover, since King Crimson is not on Spotify.